 I was looking for a different outdoor decoration for our front entrance this year and stumbled upon the idea to build my own Christmas tree topiary. I usually use greenery from the garden center and around the yard to decorate the two urns on either side of our doorway. While this looks nice I was getting tired of the same look and more importantly tired of the cleanup every spring. The question was how was I going to build a topiary that large that would also be stable enough to withstand the winter winds. A styrofoam base was an option but finding one that large would be expensive and then how would I anchor it to the urn? Then I thought why not use an upside down tomato cage. Turned upside down it makes a perfect Christmas tree shape. The big advantage is they are cheap (mine actually came from the vegetable garden), are light and provide something to wire the decorations to. A little googling and sure enough there were lots of sites with ideas on how to build a tomato cage Christmas Tree.
Here is how I made mine. For supplies you will need:
- a tomato cage, one for each urn
- medium gauge garden or fencing wire, lighter cage craft wire
- outdoor Christmas lights, one string for each tree
- decorative polyester mesh for wrapping, approximately 7 feet per urn
- decorative mesh or wide ribbon in a complementary colour to wrap the base and create a bow, about 3-4 feet per urn
- a variety of shatterproof ornaments in different sizes in whatever colour you choose
- some artificial greenery — I used holly leaves and roses
- any other whimsical ornaments you would like to add — I added some stars and bells
- 15 feet of 2 inch decorator ribbon per urn
- two large bells or a large bow for the bottom
- hot glue gun and hot glue
- tall pole, bungee cords and tent pegs for securing
The first step was to prep the tomato cage. Typically a tomato cage has three wires running vertically from the base to the top. I added two more wires between the largest spaces which would serve as additional support to tie ornaments and lighting. With the cage upside down, bring the loose wires together and tie them temporarily with wire. I tied mine loosely as I needed to remove and retie them later during installation. If your urn is being placed indoors you can tie them securely the first time. I used a combination of garden wire and fencing wire, which was what I had on hand. Any medium gauge wire will do. Next wrap outdoor Christmas lights throughout the cage, anchoring periodically to the cage supports with medium gauge wire. I used a string of 70 white LED lights and found that to be plenty for the size of the cage.
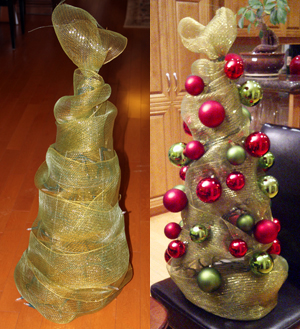
Wrap decorative mesh around tomato cage, winding and twisting as you go. Start adding decorative ribbon, ornaments and greenery with wire and hot glue.
The next step is to wrap the cage with decorative polyester mesh. I found this readily available this time of year at several locations including the Christmas section in our local hardware store, grocery store and Walmart. I purchased a 15 yard roll of metallic green for $12 and found this was enough to wrap two cages. A second roll of red was used to create the bows and finish of the base once the tree was placed on the urn. This took a bit of practice, I tried a couple of times to get it just right. My mesh was 24 inches wide, I wound, twisted and folded the mesh as I wrapped it around the cage. I anchored the top with garden wire but beware you will have to remove this wire later if installing outdoors, so don’t glue it down at the top yet.
Now it’s time to decorate your Christmas topiary tree. I wrapped a 15 foot roll of 2 inch decorator ribbon around each tree. For fun I did one in red and one in green. Again don’t permanantly secure the top if placing outside. Add ornaments starting with largest. I used both wire and hot glue to ensure they would stay secure outdoors. The wire I pushed through the mesh and twisted on the inside of the cage so it wouldn’t show. Next add greenery with hot glue. The last step was to glue smaller bells and tiny ornaments directly.
Now the big question. How was I going to secure this thing to my urns? We live in the country and the winds can get pretty intense. I had visions of my Christmas topiary urns decorating my neighbours yard by mid-December. After some thought I came up with the idea to create a central pole that would anchor the entire tree and build from there. For my pole I used a 6 foot length of 1/2 in copper pipe. On the expensive side you might say but actually I have several copper poles that I use regularly in the garden. I purchased some long copper pipe a few years ago and cut them into several lengths. I find they have a variety of uses in the garden. They were a great investment as they will last my lifetime (and longer I suspect). Anyway, fill the urn with potting soil (now I’m ready for spring already) and drive the copper pipe or similar pole through the centre. Open the top of the topiary and fit your Christmas tree over the top of the urn. Bring the wires, mesh and any ribbon together again at the top and secure around the pole. Plug in the lights and run the cord out the back. Next I took a short bungee cord and secured it on the inside top wire of the tomato cage, wrapped it around the pole and secured to the urn on the opposite side. I used four cords in all, all in different directions. I also secured the bottom wire with tent pegs. While the ornaments may be at risk, the topiary itself is not going anywhere any time soon.
Lastly, I wrapped a 3 to 4 foot length of mesh around the base of the topiary to hide the bungee cords and create a nice bow at the front. That’s it. Now we wait and see how they will hold up to our wet and windy winter.
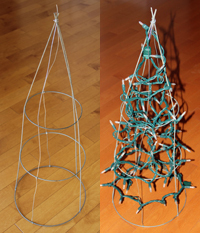
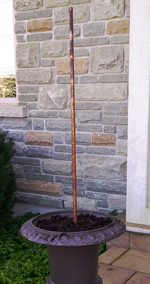

Thanks Valen, and I’m happy to report they have survived some pretty strong winds and rains so far!
I love your idea and thanks for the tutorial as well. Came upon your site from Pinterest and always appreciate a how to on cool projects.
LOVE, LOVE, LOVE these! They look great!
Great looking! Great idea to “reuse” tomato cages!
These are really neat. I’ve seen them at sims pottery this year and they are selling for 70-90.00$.
These are absolutely beautiful…..I love them! Great job!
I did this 2 years in a row….a cheaper way to anchor the topiarys..I used tent stakes,way cheaper than pipe and had no problem with the trees blowing over
I used older faux evergreen garlands I had as the base material and wrapped the cage from the bottom up. Then added lights and then wired ornaments on. I also used tent stakes to secure the tomato cage to the urn as mine already had dirt in it. I think it was a lot less work and a lot less materials than described in this one but it was all stuff I already had around the house so it didn’t cost me anything…. we’ll see how it holds up. I suspect it will be fine but we don’t have crazy winds….
Hi Chrisp. Sounds terrific. And using things you already have to get the look you want is always a great idea. I’ll be curious to know how the tent pegs works. I was afraid they would not hold up unless the soil remained frozen where I am. Our north winds in the open can be quite fierce!
I made this tree but used green garland and wrapped the tree all the way around. Then I added lights. For simplicity I didn’t do the ornaments but will add them later for variety. Instead of placing them on an urn for the front door I just used tent stakes and placed them directly on the ground. Looks pretty as is.
Sounds lovely and what a great idea – I can see a set of 3 in different sizes in my garden 🙂