I experimented with quite a few different garden design software packages. Many of them were very cumbersome or too limited for what I wanted. I eventually found that it was easier to use an Excel spreadsheet by treating it like graph paper and combining this with the many autoshape tools in Excel. The end result can give you a plan for your garden as well as a useful plant list. You can even track information about your plants in the sheet if you like.
Below are some simple instructions on how to draw a garden design plan without using special garden design software.
Step 1: Create a grid
Basically, I use an Excel spreadsheet like it is graph paper and just draw out my plan to scale.
- Start by making a grid in your Excel worksheet. I change the column width and row heights to look like grid paper. Looking at my saved sheets, they say the column width is two and the row height is 15.5. Make as many columns and rows on this scale as you think you will need. You can always insert more if needed.
- Each square now represents your scale. For my purposes, I count one square as 2 feet, but it could be anything you want depending on how big the garden is you are drawing. Put your measurement scale along the top and along the left. You now have a spreadsheet that looks like graph paper with measurements down the top and left side.
You can download my blank Excel Garden Plan – it’s set as each square is 1 foot, but you can easily change this by adjusting the numbers in the top row and left column.
Step 2: Insert a photo if you have one
If you have access to a drone or can download an overhead shot from Google Earth, consider adding this to the grid as your bottom layer. You can use this to draw in your hardscapes and add any pre-existing plants.
Step 3: Draw in the hardscapes
Next, draw in the hardscapes (house, patio, etc) and basic bed shapes. I use the features in the drawing toolbar to do this. You can select lines, arrows, squares, circles and a huge variety of shapes under AUTOSHAPES.
To make curved beds, I use the curve line option under auto shapes. Go to AUTOSHAPES — LINES — CURVES. Now, just draw your shape by clicking on your grid paper and keep clicking along the way. Everywhere you click, you get a point anchored to your plan. Don’t worry if it’s rough — you can adjust the shape later. Just get in the general shape. If you need to close in your shape (e.g. a stand-alone bed), curve back to the starting point and DOUBLE CLICK, and it will automatically close your shape.
Now that you have your rough bed shape drawn right-click on the shape (sometimes you have to be right on the line) and select EDIT POINTS. You will now see a series of small black squares marking every spot where you clicked on your graph paper. You can literally pick these up and move them around. Also, you can pick up any spot on the line and make a new point. For fancier editing, right-click your mouse on one of these points, and you will see many more options. You can delete a point, open up a curve you closed, or make a segment between points that are straight or curved.
SOME HINTS:
- Under view zoom in fairly large, this makes editing easier.
- To make nice curves, I make a temporary circle and follow the pattern. I place a circle shape on the grid and size it (double click a shape, and you can get very precise using the SIZE box). Put it alongside your curve, and now make your points follow the curve. Then, I delete the circle when I am happy.
- You can fill or not fill your beds as you desire. If you fill it out, be careful of the “order” of your objects (we’ll get into that in a bit).
- You can rotate a shape once you make it in either of two ways: click on the shape & if you have a green dot, you can just drag it around until you like its placement. You can also double-click on the shape, go to the SIZE box, and you will see a rotation box — just enter a number, e.g. 90, to rotate right 90 degrees. -90 means rotate left 90 degrees.
Step 4: Putting in some details
Next, colour in any details you want in the plan. For example, for the patio pattern, I made a series of rectangles, sized them, filled them in with texture, and then placed them to look like patio stones. You only have to do the first few, cut and paste afterward.
- Hint: To move things, you can use your mouse, or for finer movements, use your arrow keys.
- If you create a scene that involves a lot of shapes (like the patio or a table and chairs set), it is convenient to group them together so you can move them as one item. To do this, select two or more shapes, right-click, and go to GROUP. The items now move together. You can ungroup, regroup, or group with other shapes/groups as needed.
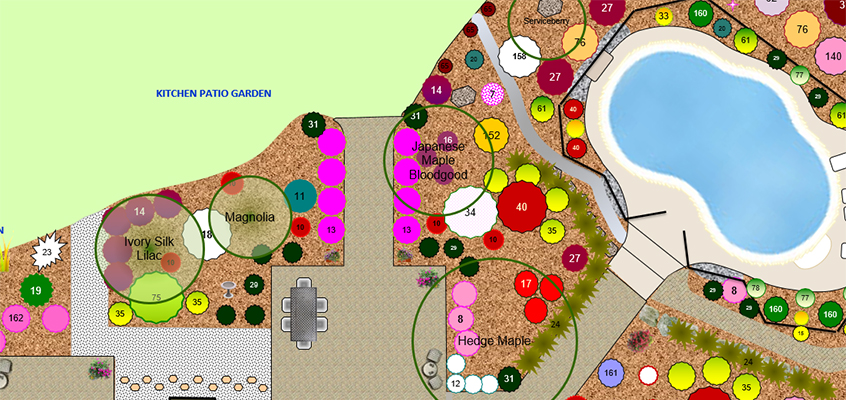
Step 5: Planting
Next comes the fun part, planting (just like real life — create the hardscape, get the beds ready & go!). I use a variety of shapes from auto shapes, mostly from the STARS AND BANNERS category. I then size them and colour them (fill) as I like. I try to follow foliage or flower colour if I can. I use my scale for sizing. I also tend to make my shapes follow a pattern, for example, pointed shapes for evergreens, slightly more curved/rounded for shrubs, another shape for perennials/spreaders, etc.
Hint: Notice the yellow dot in some of the shapes from STARS AND BANNERS when you click on them. Move this, and you can change the depth of the edging.
Next, I add plant information. Right-click the plant shape, and you can add text. Depending on the size of your scale, full plant names may not fit, so I tend to number my plants then put an index somewhere on the page or on another sheet. I even sometimes use one scale for shrubs (e.g. 1,2,3) and another for perennials (a,b,c). You can add text boxes for longer descriptions as well. These can also be rotated if you like.
Ordering shapes. Since all of your objects are shapes placed on a sheet, some will fall in front, some behind. You can shuffle shapes up or down as needed (for example, you obviously want plants to appear on top of a filled-in bed). Just right-click on the shape and go to ORDER, and you will see BRING TO FRONT, SEND TO BACK, etc.
That’s it. Now, you have a scale drawing of your garden.
Just to say many thanks for taking the time to explain this. Really helpful and I’m now well on the way to a design for my daughter’s new garden.
Glad you like it! I enjoy the planning process. It’s often what gets me through the winter. I’d love to see your end result.
Thank you for sharing your planner! I spent hours looking on line and getting frustrated, thinking how I would love to have the drawing, the plant list AND the calendar with reminders of what to do in different months. Excel allows all of that and you made it so helpfully clear, thank you
A have looked all over the net for this . This is just what I was looking for. Thank you
I have often wondered if this could be done using all the things I am likely to use.for the input, so it was great to see this. However, I need to do a plan for our local Council which must be printed at a scale of 1:250.How can I do this?
Hi Dan, I’m not sure. You’d have to keep playing with the row width & cell width to get the scale you want. You could add a ruler to the top bar in excel then maybe use this calculator https://www.inchcalculator.com/scale-calculator/?
Yeah, this is perfect.
So happy I came across your page. Even more so you had created a ready-made Excel sheet as I was having difficulty changing the cells. Expect me to keep popping back with more comments and advice.
Good on you.